ROX 4.0
All you need – and more


GPS BIKE COMPUTER WITH ALTITUDE MEASUREMENT
AND INTELLIGENT NAVIGATION
The ROX 4.0 GPS supports you with its more than 30 functions and its user-friendliness on your bike tour, so that you can concentrate on the essentials: The fun of cycling. The extra large display reliably shows data such as altitude profile, speed, distance and training time. Navigation including re-routing function and the coupling to the e-bike as well as external sensors are a matter of course for the ROX 4.0 bike computer!
neW
Intelligent navigation functions

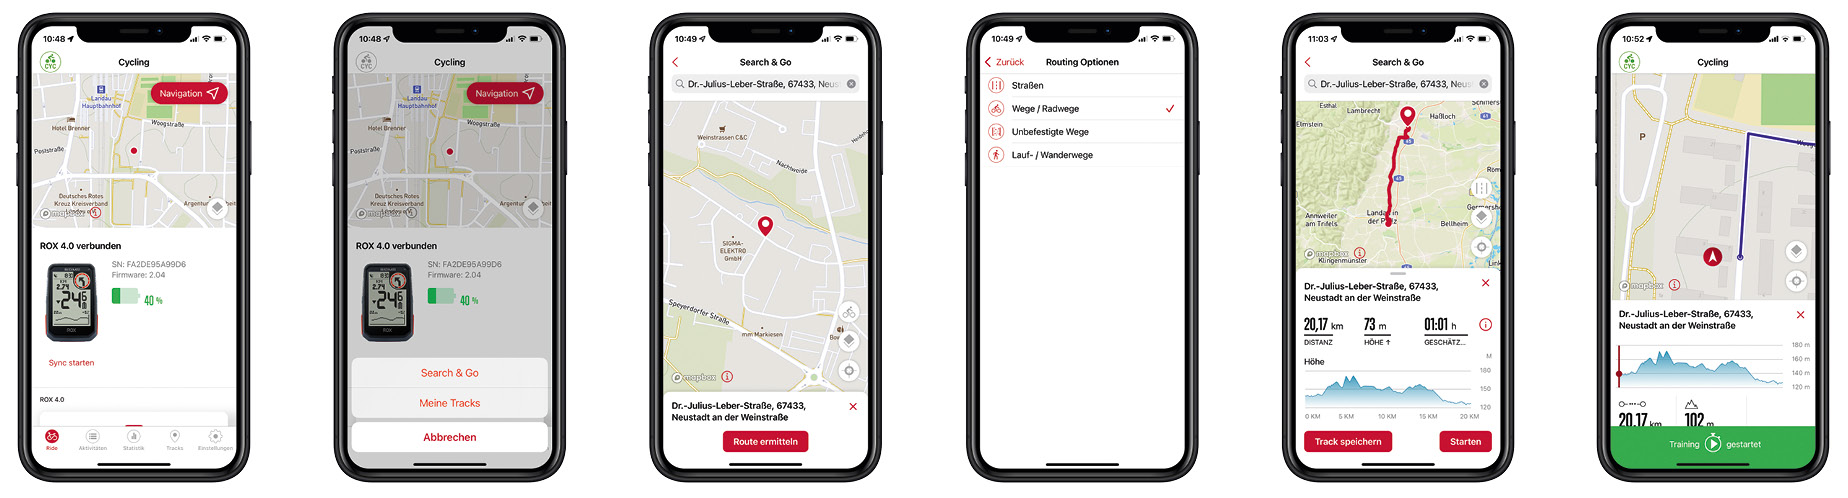
SEARCH & GO
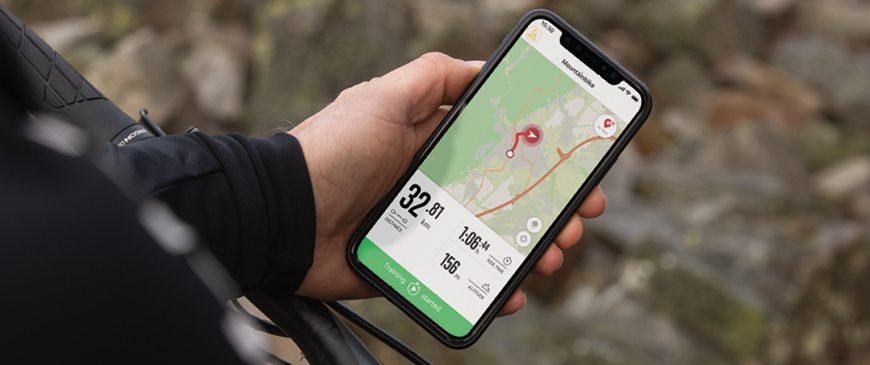
“Search & Go” navigation allows you to find a specific location and navigate there. You can enter an address into the SIGMA RIDE app on your smart phone or click on a point on the map. Trail preferences (bike trails, dirt roads, paved roads, and running/hiking trails) can be set individually. The track thus created can be started directly on your ROX 4.0 or saved in the RIDE app for later.
RE-ROUTING AND TURN-BY-TURN DIRECTIONS
During navigation, the ROX 4.0 display shows the track and turn-by-turn directions. A turn arrow and audible signal alert you to the next turn. To make sure you don’t miss a turn, the Red Circle counts down the distance to the next turn using colored bars. They become less the closer you get to the turn. The ROX 4.0 also displays the street name. If you spontaneously deviate from the suggested route, your ROX plans a new route to the destination with a correspondingly updated elevation profile in a flash in interaction with the SIGMA RIDE app.

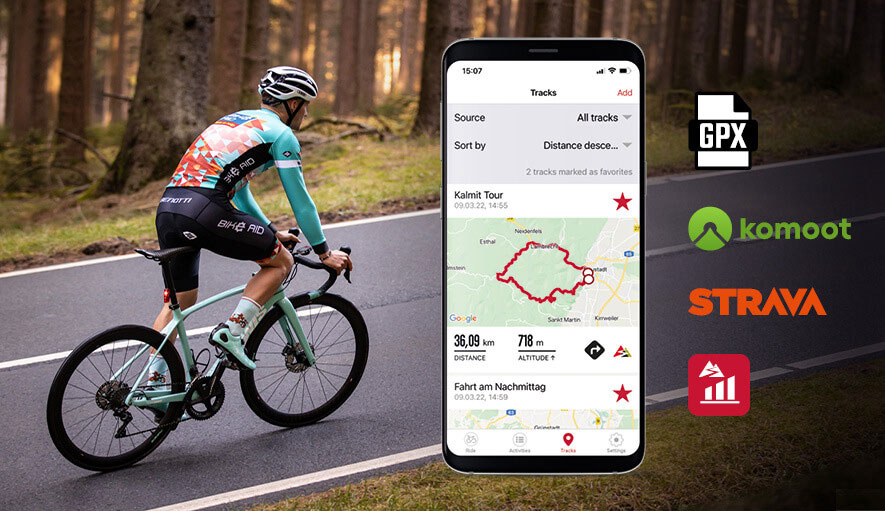
Tracks from third parties
The track navigation allows you to precisely ride a planned route. To do this, create a track in the SIGMA DATA CENTER or with a tour portal of your choice (komoot, Strava, etc.) and import it into the SIGMA RIDE app. You can then start your tour in the app and ride it right away or save it and start it later on your bike computer. This allows you to navigate your tour without a connection to your smart phone.
READY TO GO ANY TIME!
The ROX 4.0 bike computer can be positioned directly on the handlebars in a few easy steps –
entirely without cables or sensors. If you want, you can connect your Rox 4.0 to additional
sensors for measuring speed, heart rate, and cadence.
Your ROX uses GPS and GLONASS to determine your position within a few seconds of being switched on.
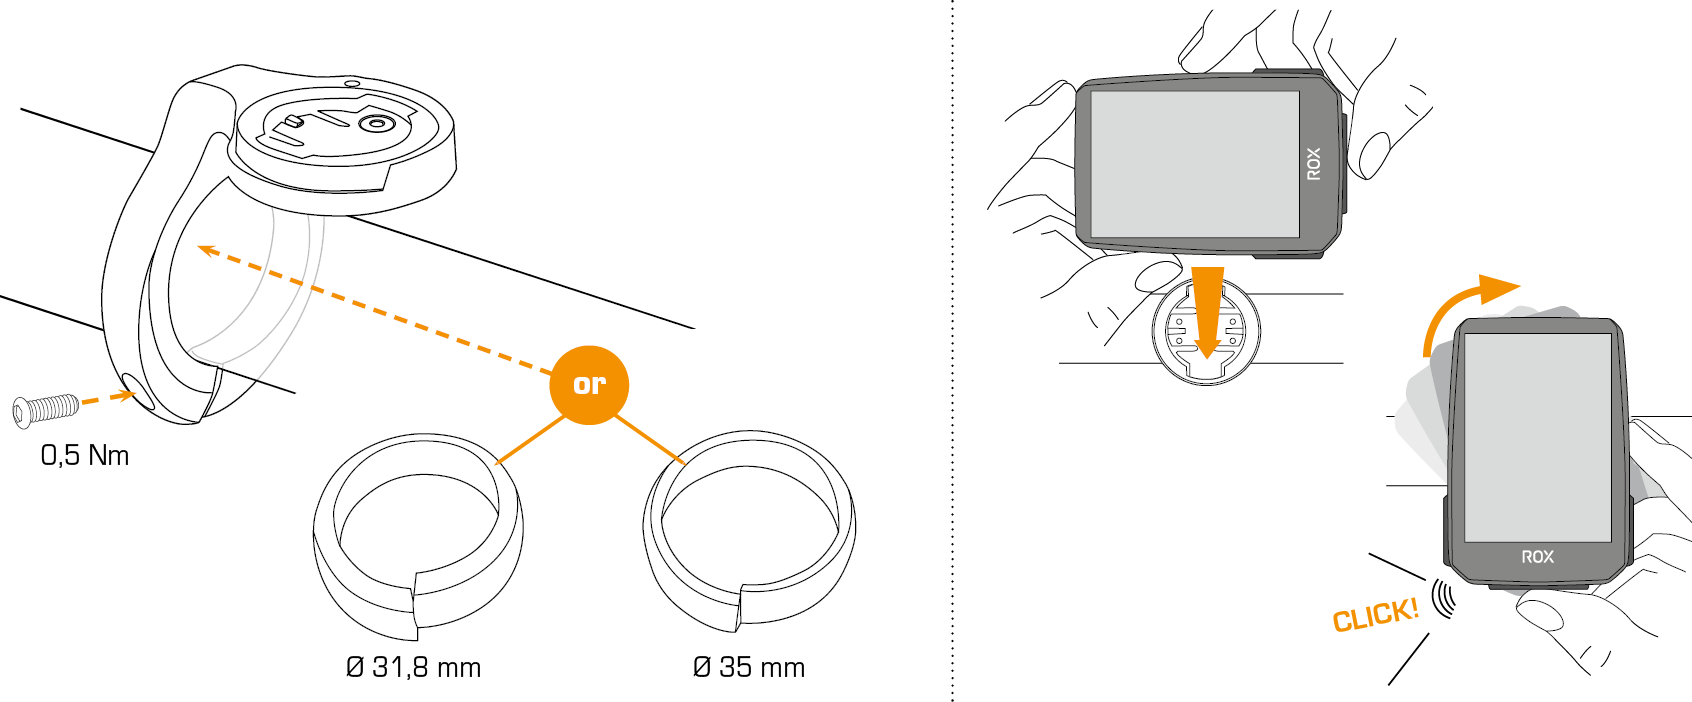
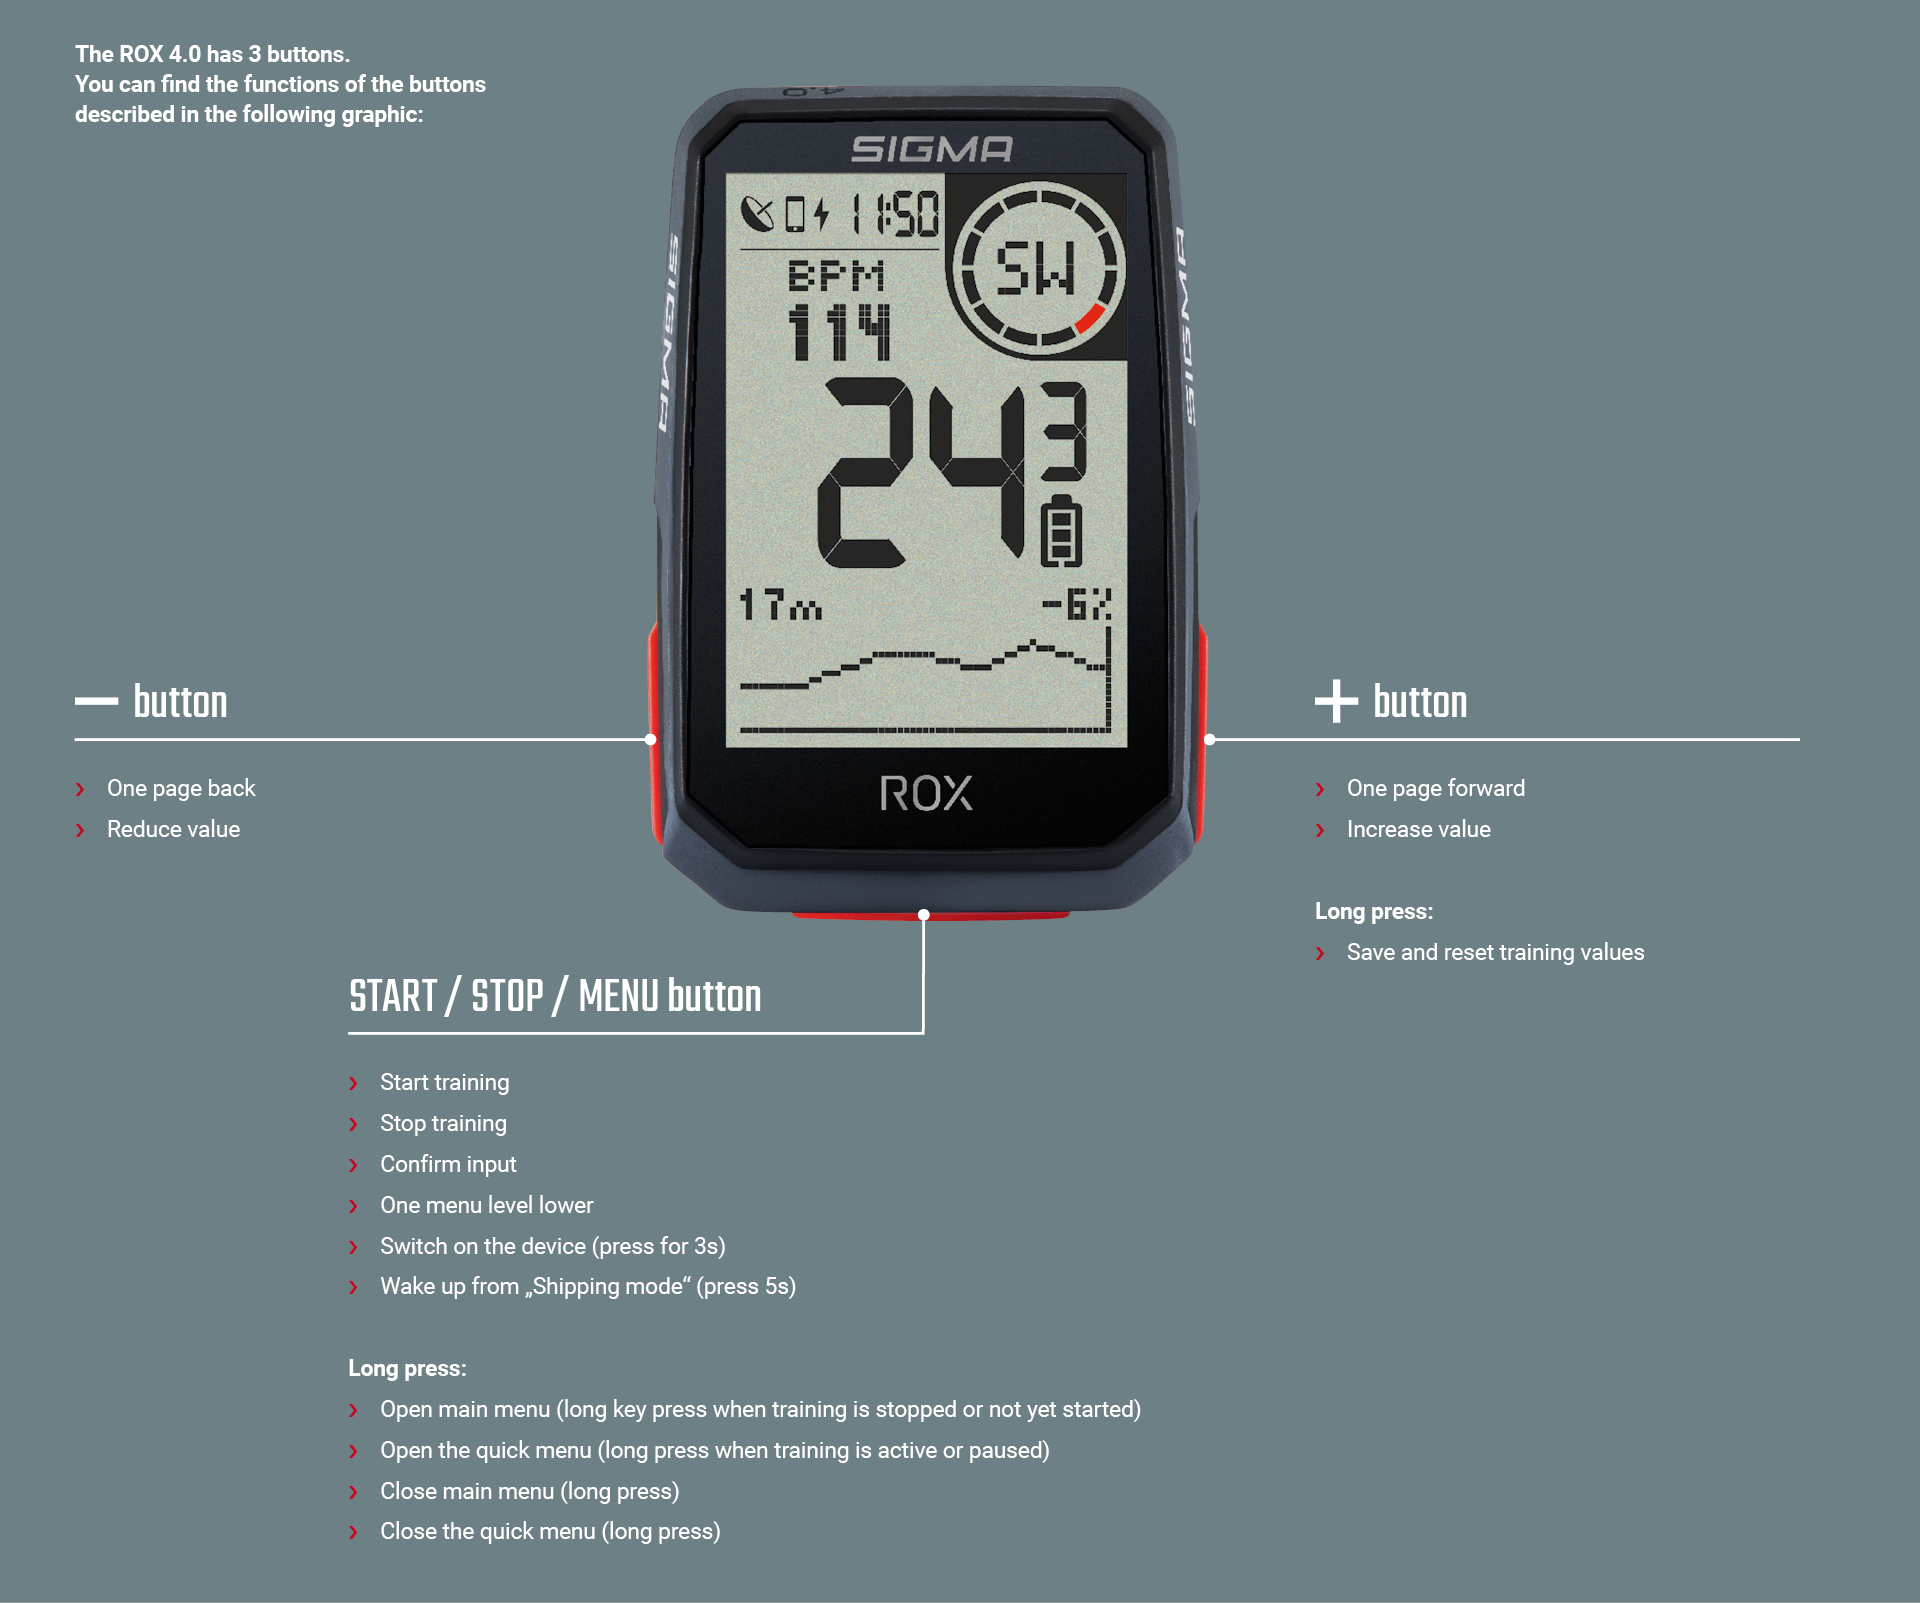
The user-friendly operation with three buttons enables you to start a bike tour right away.
You can use the SIGMA RIDE app to set your individual display views.
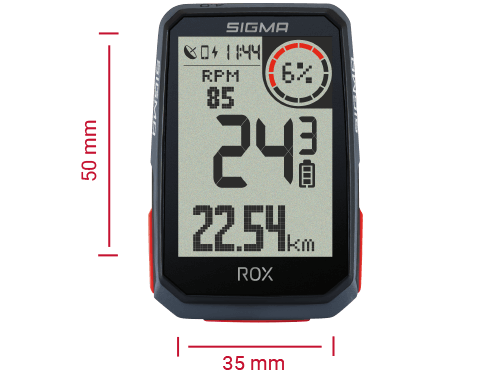
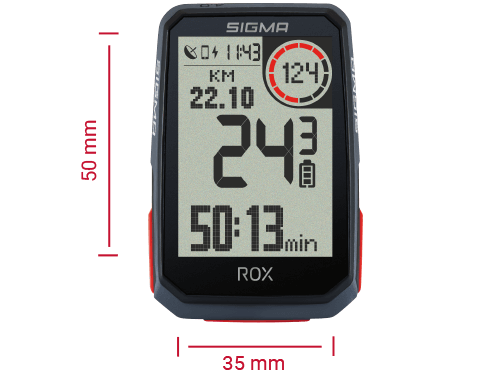
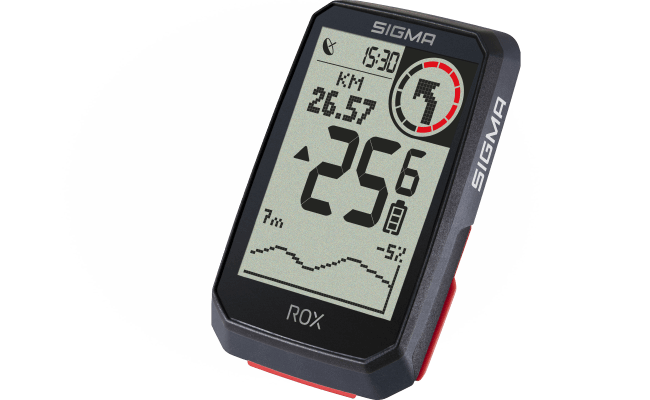
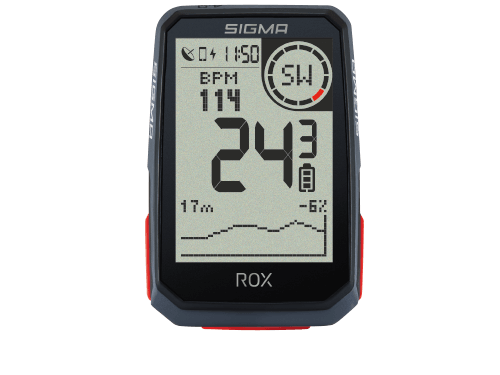
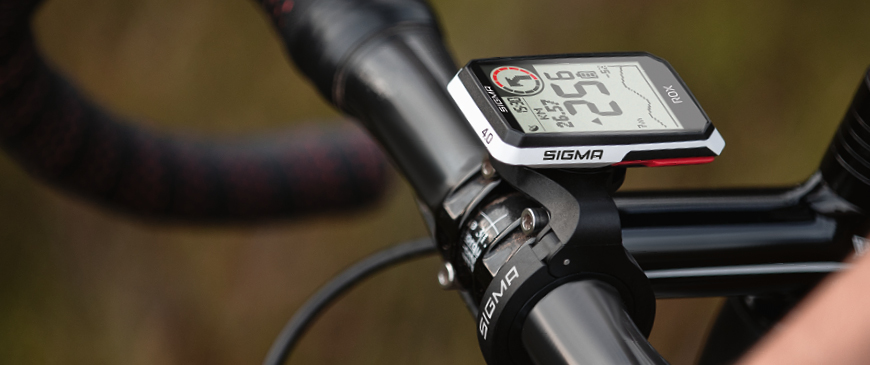
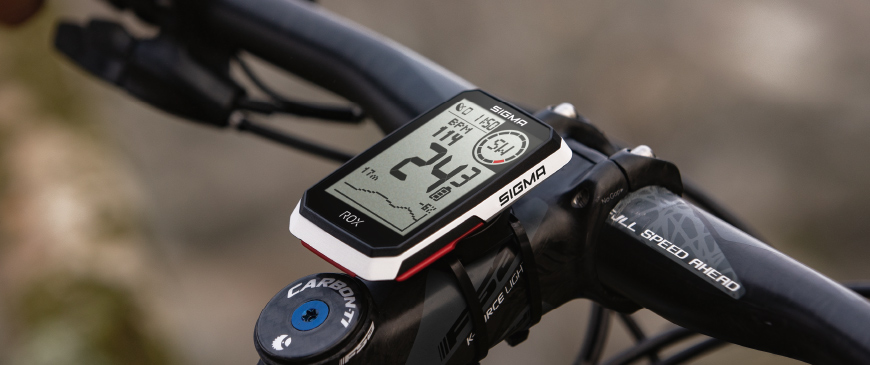
LARGE DISPLAY
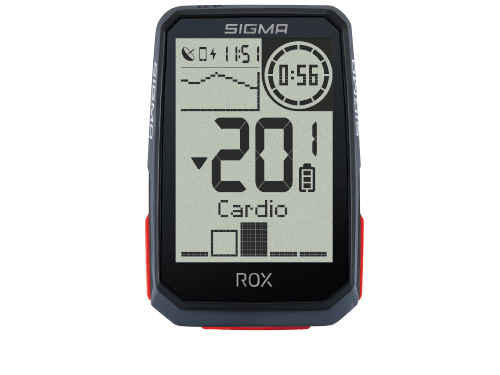
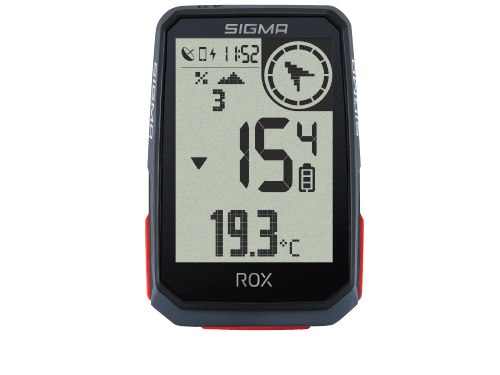
The 2.4-inch-diagonal high-contrast display and extra-large numbers make it easy to read, even during a ride.
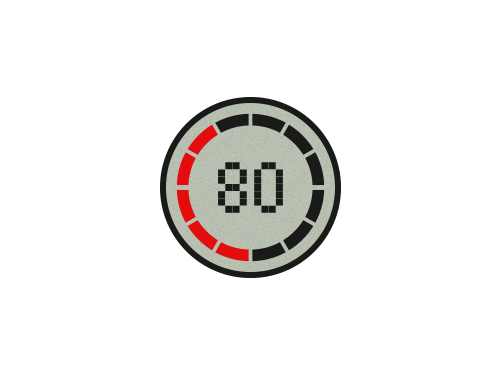
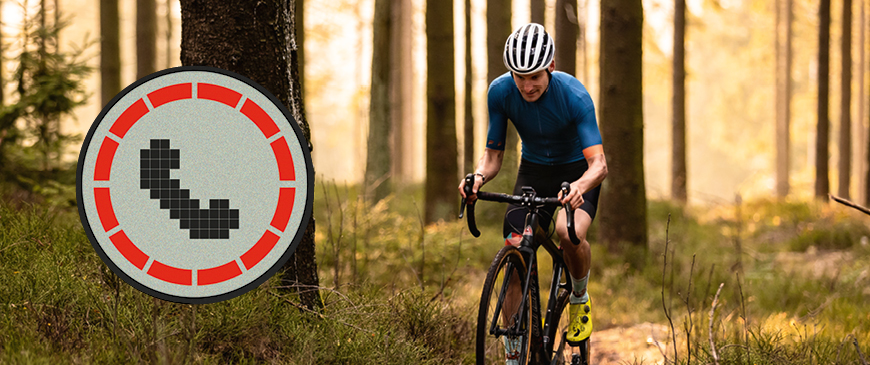
Red Circle
The innovative Red Circle on the upper right corner of the display is highlighted in various colours and offers innovative, interesting display of training data.
EVERYTHING AT A GLANCE
The SIGMA RIDE app allows you to set your display view individually. You can set up to six views, each with three values. Current speed and time are shown continuously on the display.
UP WHERE THE AIR IS CLEAR
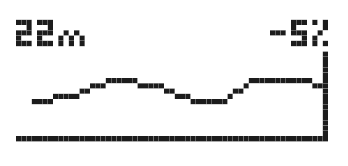
A true highlight of the ROX 4.0 is the integrated air pressure sensor. It uses barometric readings to determine inclines and declines and provide you with reliable information about altitude, allowing a precise recording of your track. You can also call up a graphical altitude profile on the ROX 4.0. The home altitude at the beginning of the tour is determined automatically from GPS, or you can set altitude manually.
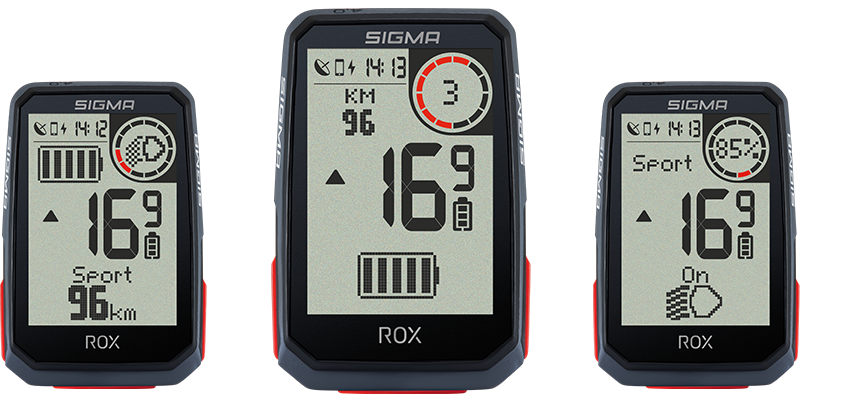
E-BIKE-READY
You ride an e-bike? No problem. The ROX 4.0 is e-bike-ready and can be easily connected to many e-bikes. Your GPS bike computer establishes a connection to the compatible e-bike system and shows you the current assist mode, battery status, and light and other data on the display. You can use this list to find out if your E-BIKE is compatible with the ROX 4.0.


BEST MEASUREMENTS
Do you need more data or even greater accuracy for your values? ANT+ and BLE enable you to connect external sensors such as speed, heart rate, and cadence sensors to your ROX 4.0. You can find accessories sets with various sensors for your ROX in our shop.

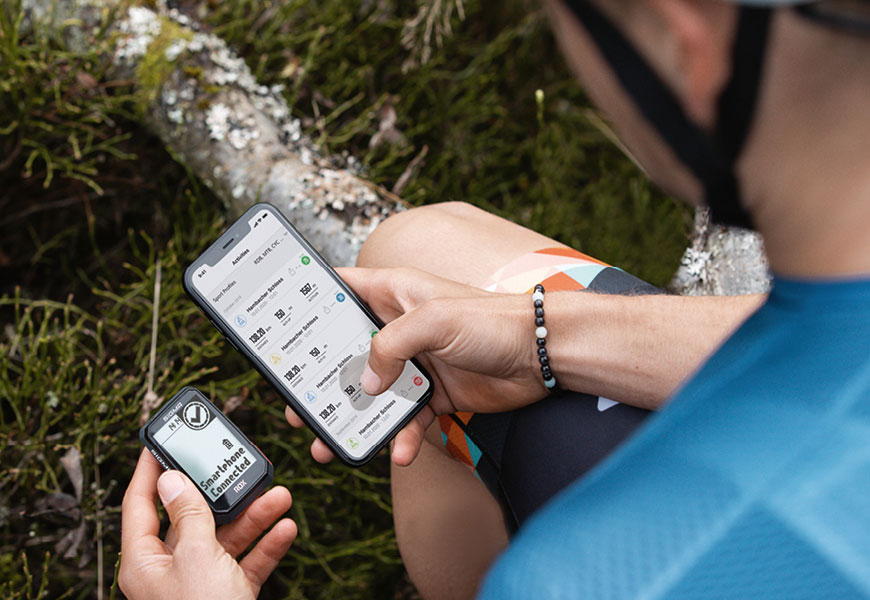
FOR DATA COLLECTORS
You can use the SIGMA RIDE app to collect your training data, transfer them to your smart phone via BLE, and quickly set your favourite display views on your smart phone. The most important data and statistics can be read from your smart phone in real time with the SIGMA RIDE app’s LIVE function and assessed conveniently.
SMART FunCtionS
PERFECTLY POSITIONED
The Over Clamp Butler lets you align your ROX bike computer perfectly, even when using a short stem. The computer can be positioned directly over the stem, giving you more space on your handlebars and a clear view of all of your data, no matter what bike you’re riding. The Butler fits on 31.8mm and 35mm diameter handlebars.
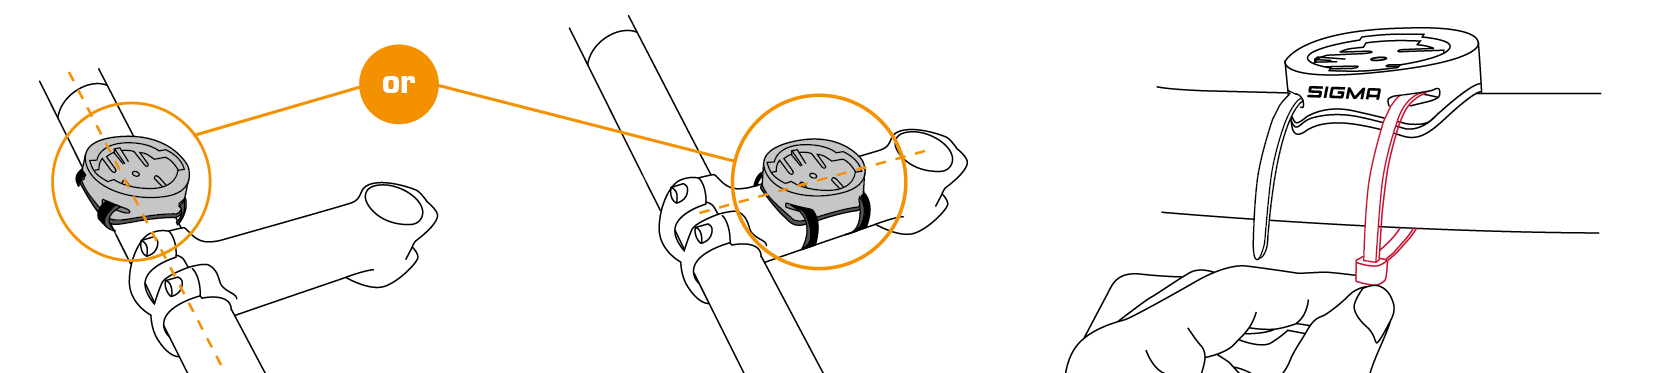
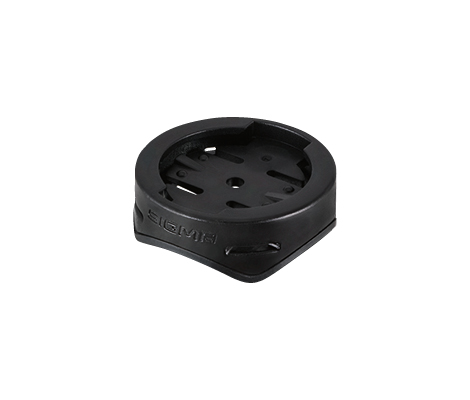
THE CLASSIC
The classical SIGMA GPS handlebar bracket can be fixed in place without tools in a few seconds with two cable ties. This gives you a choice between installation on your handlebars or on the stem, and the device fits handlebars of all sizes.
sigma stories


ROX 4.0
UVP: 109,95 € – 209,95 €
incl. VAT plus Shipping Costs
Delivery time: 2 - 3 Days
Compare ProductFeatures & functions
| General | ||||||||||||||||||||||||||||||||
|---|---|---|---|---|---|---|---|---|---|---|---|---|---|---|---|---|---|---|---|---|---|---|---|---|---|---|---|---|---|---|---|---|
|
||||||||||||||||||||||||||||||||
| Navigation | ||||||||||||||||||||||||||||||||
|
||||||||||||||||||||||||||||||||
| Sensors | ||||||||||||||||||||||||||||||||
|
||||||||||||||||||||||||||||||||
| Training | ||||||||||||||||||||||||||||||||
|
||||||||||||||||||||||||||||||||
| Data analysis | ||||||||||||||||||||||||||||||||
|
||||||||||||||||||||||||||||||||
| Basic functions | ||||||||||||||||||||||||||||||||
|
||||||||||||||||||||||||||||||||
| Altitude measurement | ||||||||||||||||||||||||||||||||
|
||||||||||||||||||||||||||||||||
| Cadence functions | ||||||||||||||||||||||||||||||||
|
||||||||||||||||||||||||||||||||
| Heart rate functions | ||||||||||||||||||||||||||||||||
|
||||||||||||||||||||||||||||||||
| E-Bike functions | ||||||||||||||||||||||||||||||||
|
||||||||||||||||||||||||||||||||
| Navigation functions | ||||||||||||||||||||||||||||||||
|
||||||||||||||||||||||||||||||||
| Status functions | ||||||||||||||||||||||||||||||||
|
||||||||||||||||||||||||||||||||
Service
-
Tutorial videos
-
Installation Mount - GPS Mount
You are currently viewing a placeholder content from Youtube. To access the actual content, click the button below. Please note that doing so will share data with third-party providers.
More Information -
Installation Butler - OVERCLAMP BUTLER GPS
You are currently viewing a placeholder content from Youtube. To access the actual content, click the button below. Please note that doing so will share data with third-party providers.
More Information -
Installation Sensors - DUO MAGNETLESS CADENCE
You are currently viewing a placeholder content from Youtube. To access the actual content, click the button below. Please note that doing so will share data with third-party providers.
More Information -
Installation Sensors - DUO MAGNETLESS SPEED
You are currently viewing a placeholder content from Youtube. To access the actual content, click the button below. Please note that doing so will share data with third-party providers.
More Information -
Firmware-Update: New navigation features for the ROX SERIES
You are currently viewing a placeholder content from Youtube. To access the actual content, click the button below. Please note that doing so will share data with third-party providers.
More Information -
SIGMA RIDE App - Transfering a Track
You are currently viewing a placeholder content from Youtube. To access the actual content, click the button below. Please note that doing so will share data with third-party providers.
More Information -
ROX 4.0 Tutorial E-Bike Connection
You are currently viewing a placeholder content from Youtube. To access the actual content, click the button below. Please note that doing so will share data with third-party providers.
More Information -
ROX 4.0 Tutorial Customize Training Views
You are currently viewing a placeholder content from Youtube. To access the actual content, click the button below. Please note that doing so will share data with third-party providers.
More Information -
ROX 4.0 Tutorial Basic operations
You are currently viewing a placeholder content from Youtube. To access the actual content, click the button below. Please note that doing so will share data with third-party providers.
More Information -
ROX 4.0 Tutorial Altitude Calibration
You are currently viewing a placeholder content from Youtube. To access the actual content, click the button below. Please note that doing so will share data with third-party providers.
More Information -
ROX 4.0 Tutorial Pairing to a Smartphone
You are currently viewing a placeholder content from Youtube. To access the actual content, click the button below. Please note that doing so will share data with third-party providers.
More Information -
ROX 4.0 Tutorial Sensor Connection
You are currently viewing a placeholder content from Youtube. To access the actual content, click the button below. Please note that doing so will share data with third-party providers.
More Information -
SIGMA RIDE APP & ROX 4.0 – How to use komoot tracks incl. turning guidance
You are currently viewing a placeholder content from Youtube. To access the actual content, click the button below. Please note that doing so will share data with third-party providers.
More Information
-
-
Manual
-
ROX 4.0 – General information
How do I perform a tour data reset?
Press and hold the right button until the tour has been saved.Description of the HR zones
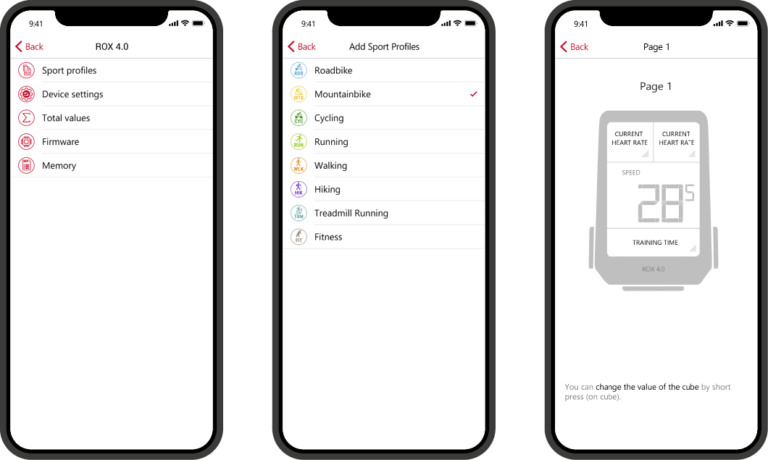
For better training control, HR zones derived from the individual maximum heart rate are displayed for various training areas.Range Per cent of maximum heart rate Meaning 1 (Recover) <60% Relaxed, easy ride. Low load 2 (Cardio) 61%-70% Comfortable ride 3 (Fitness) 71%-80% A slightly more strenuous ride, good training for the cardiovascular system. 4 (Performance) 81%-90% Fast ride that is more demanding. 5 (Speed) 91%-100% Maximum performance that can only be maintained for a short time. How do I delete my sport profiles?
Open the SIGMA RIDE APP and select the device you are using.
In the Sport profiles tab, you can delete the corresponding sport profile by swiping from right to left.What does the red circle on the device display mean?
The Red Circle is a graphic element that supports the training value in this circle. For example, it counts down slowly when you make a turn so that you can see when the next turn is coming up. Another example would be the compass. Here, the two red elements always point north.How do I recognise whether the sensors are connected via ANT+ or BLE?
In the menu under Connections->Sensor->Sensor list, you can display the connected sensors. Depending on the connection, either ANT+ or BLE is displayed at the top leftHow can I set the time zone and time of day?
Time zones / time – Every time you switch on the device and acquire satellite signals or synchronise the device with your smartphone, it automatically determines the time zone and the current time.What do the AM pop-up settings mean?
Assist mode pop-ups are brief displays of your e-bike’s assist mode when you change it.Can I also use third-party mounts?
Only use the mount from SIGMA SPORT. -
Assembly
-
GPS Mount

-
Overclamp Butler

-
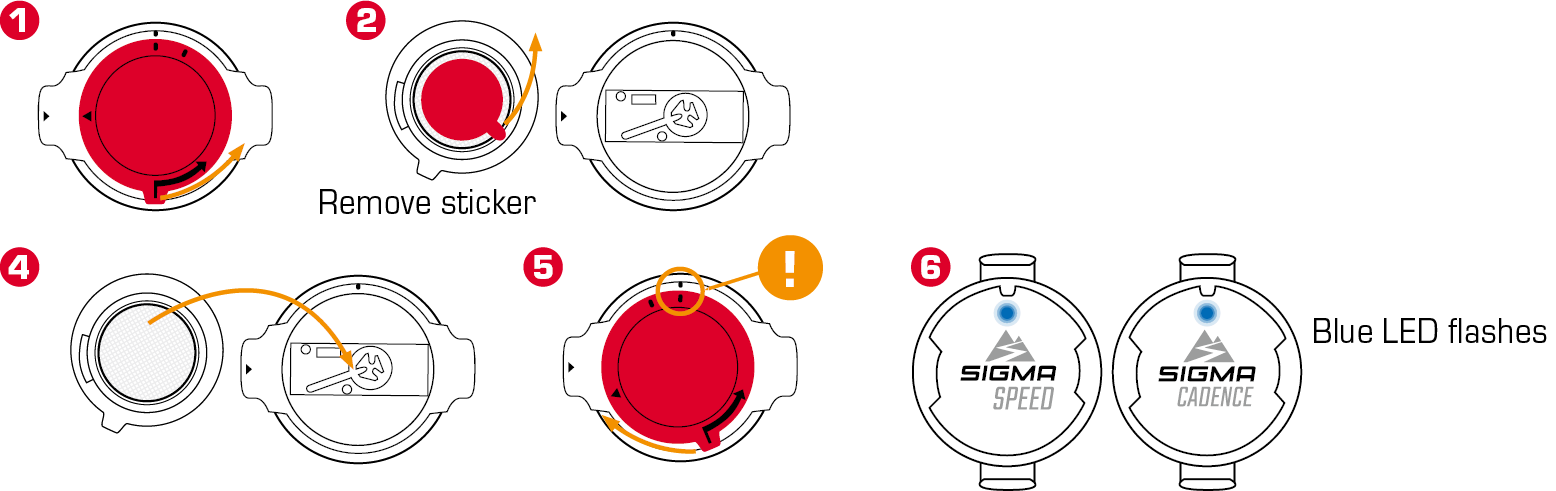
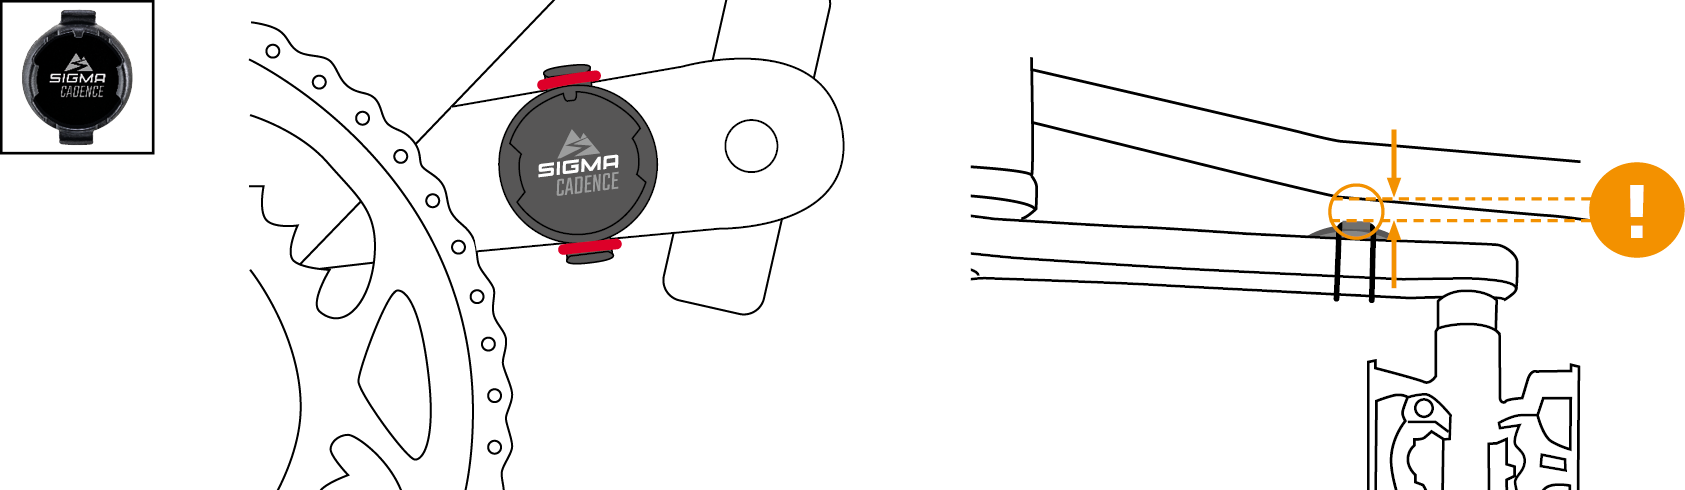
Speed / cadence transmitter FIRST START

-
Speed transmitter

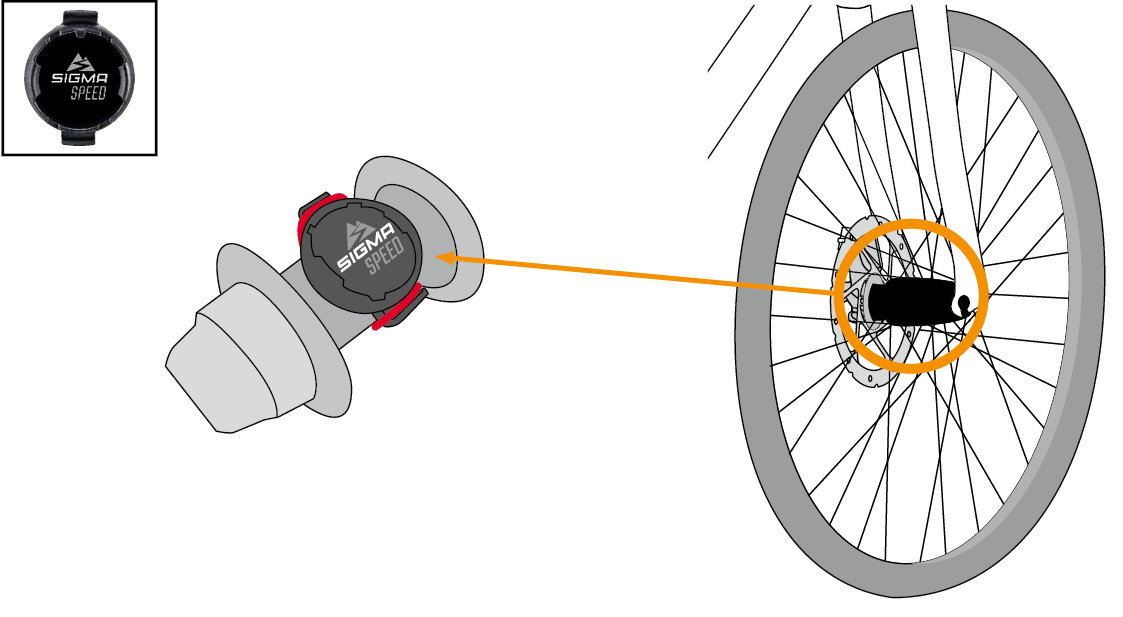
The SPEED-Sensor can be mounted on the bicycle hub of both wheels.
-
Cadence transmitter

-
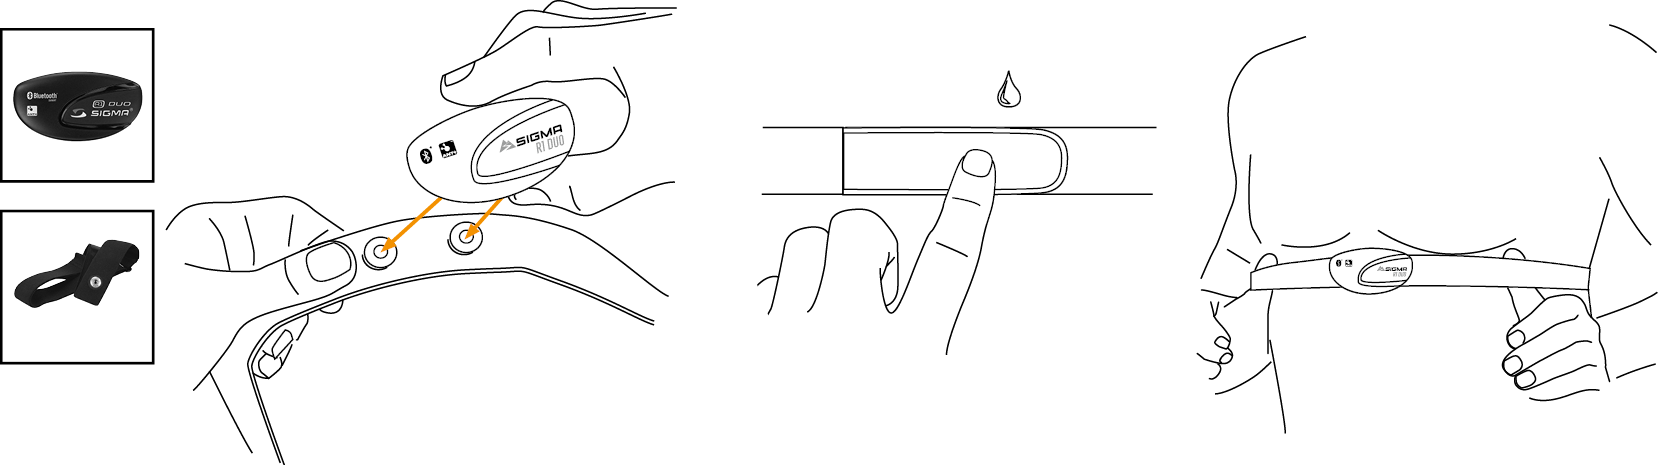
Heart rate transmitter

-
-
First start

If you want to use the device for the first time, hold down the START / Menu
 button for 5 seconds. This will take you to the wake up menu in which you can make all important settings.
You have 2 options for this:
1. Connect the smartphone and set the ROX 4.0 with the SIGMA RIDE app
2. Make the settings manually on the ROX 4.0To connect the smartphone, please follow the instructions in the chapter Connecting a smartphone. To adjust a setting manually, select the desired value with the + or – button and confirm this by pressing the START button.
At the end of the setting you have the option of connecting sensors such as a heart rate chest strap, please follow the instructions in the chapter Connecting the sensor.When all settings have been made, you can use the device. To assemble the device, please follow the steps in the chapter Assembly.
-
Buttons

-
TRAINING WITH THE ROX 4.0
Every time you switch on the device, the ROX 4.0 starts in the training screen to enable you to start training as quickly as possible. To switch on the device, press and hold the START button for 3 seconds. The ROX 4.0 starts searching for GPS satellites immediately after it is switched on.
-
GPS Fix
To enable the ROX 4.0 to be connected to GPS / GLONASS as quickly as possible, please follow these instructions:
› Find a field that is as open as possible (no trees, houses, etc. that interfere with reception)
› If possible, do not move until you have received the message ”GPS OK” or the GPS icon no longer flashes
› Synchronize the ROX 4.0 with the SIGMA RIDE app as regularly as possible so that the most current GPS data is always available on the device -
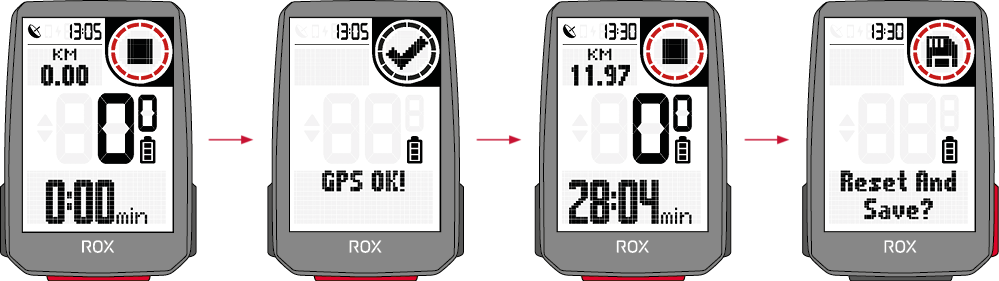
Training process
If you want to use GPS, wait until the message “GPS OK”. Then press the START button once to start the workout. If no data is recorded, the training is either in AutoPause or stopped. In this case you will see the training status in the display (circle element).

If you have not yet started the training, but are moving at more than 2.2 km/h, you will receive a recurring request to start the training. Data is only recorded when it has been started.
You can change the training views for the current sport profile at any time during the training. To do this, use the SIGMA RIDE app and follow the instructions in the “Setting training views” chapter.If you would like to change other settings during training, such as auto pause or tones, press and hold the START button to access the quick menu.
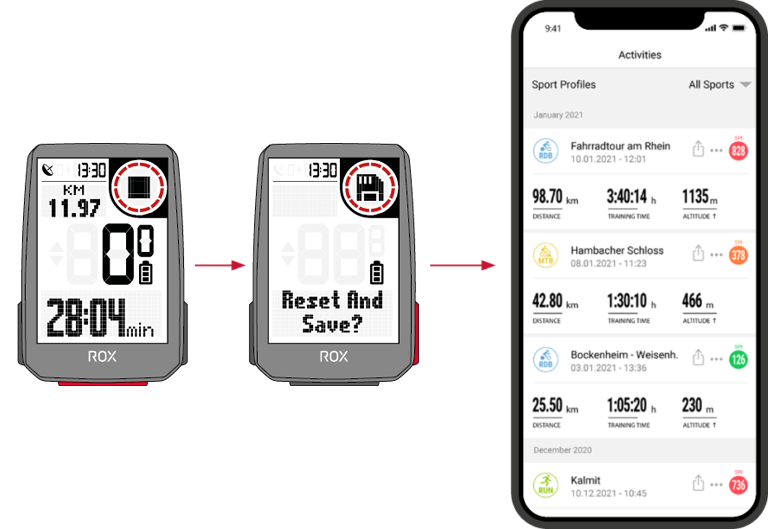
If you want to end the training, press the START button once. You can now start the training again by pressing the START button, or you can leave the training and save the training session.
To do this, hold down the ”+” button. -
Saving and evaluating the training
The training data is synchronized with the SIGMA RIDE app after the training. You can also synchronize the training data with the PC and the SIGMA DATA CENTER via a USB connection.
You also have the option of synchronizing the data with the SIGMA RIDE app in third-party portals. Instructions for this can be found in the chapter “Synchronizing training data with third-party software”.
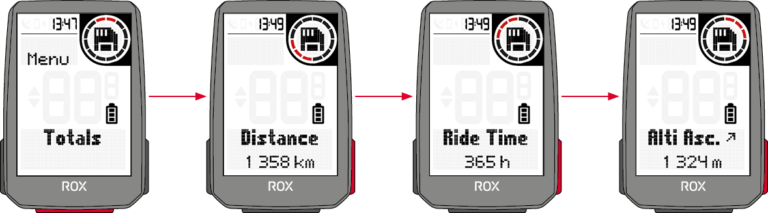
You will also find an overview of the total values performed on the device. To do this, open the main menu and select the Storage › Totals area.
-
-
Operation of the device
-
Menu structure
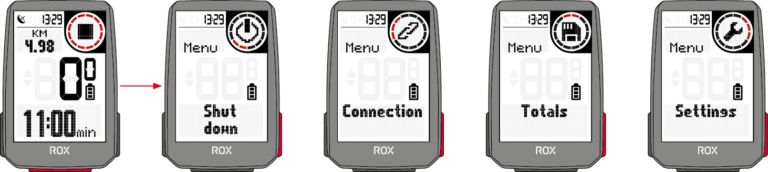
The ROX 4 has 2 different menus, both of which can be called up by long pressing the START button. In the menus you will always find the option Back as the last item.
This will leave you with the current one and return to a higher menu level.Main menu:

You can reach the main menu if the training has not yet started or is in a stopped state (ATTENTION not AUTOPAUSE).
Via the main menu you can access all available settings as well as a smartphone or external sensors for the first time.Quick menu:

You can access the quick menu when the training has started or is in AutoPause. In the quick menu you only have access to the most important training functions and settings.
While exercising, press and hold the START button to open the quick menu. -
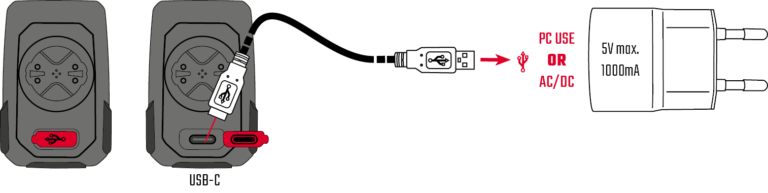
Charging and battery life
The ROX 4.0 has a standard USB-C connection. You can charge the ROX 4.0 at any USB port that meets the following specifications:
Voltage: 5V
Charge current at least: 1000mA
The ROX 4.0 can also be charged while driving, e.g. if you connect a power bank to the device.

Depending on the charger used, the charging time is approx. 2.5 – 3 hours. During the charging process, you can see the current charge status on the display.
Depending on how the device is used, the battery life will vary. The usual running times can be found in the following table:
Please note: The scenarios shown are sample values. They serve as a guide to the expected running times of the ROX 4.0 and provide you with guidance on how to extend battery life. -
Communication with external sensors
The ROX 4.0 can connect to external sensors using two different radio protocols: Bluetooth Low Energy (BLE) and ANT +. Please note that many sensors offer both protocols.
In that case you only have to connect ONE of the two channels to receive the data from the sensor. We recommend using the ANT + channel here.The following sensors can be connected:
BLE / ANT +:
› Speed sensor
› Cadence sensor
› Combo sensors for speed and cadence
› Heart rate sensors (e.g. chest strap)Please refer to the sensor manufacturer’s operating instructions to find out whether your sensors support the protocols mentioned. How to establish the connection can be found in the chapter
Setting the connection to external sensors. If the sensor has been found by the ROX 4.0, you will receive a short message about the successful connection.
-
-
Settings
Basically, you have different options to adjust the settings of the ROX 4.0 according to your wishes. You can do this either directly on the device or with the SIGMA RIDE app.
-
Change settings on the device
This chapter describes the settings that you can set in the main menu. If you have already started the training, you only have a selection of setting options in the quick menu.
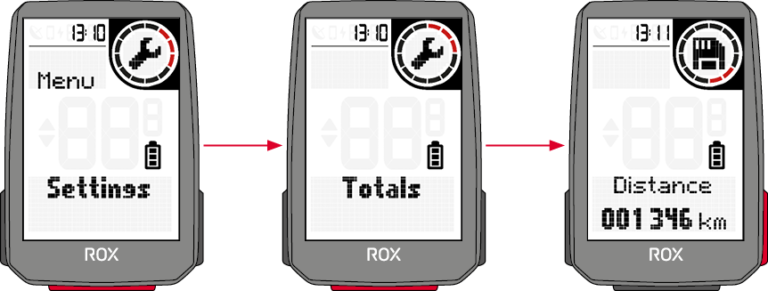
You will find the following options for setting the device in the Settings menu:
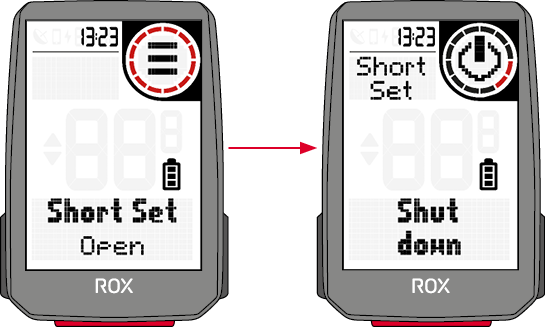
› Shut Down: Here you can switch off the device.
› Connection: Here you can set up connections to external sensors, a smartphone, eBIKE or Komoot
› Total values: Here you will find an overview of your total values, such as distance, altitude, etc.
› Settings: Here you will find all device settingsThe functionality of the 4.0 is congruent in all settings. Use the + or – button to select the menu item to be set, with START confirm the selection.
Then you can make the setting with the + or Minus button and confirm again with START. You can close the menu at any time by holding down the START button.
-
-
Set connections
-
Connection to the smartphone
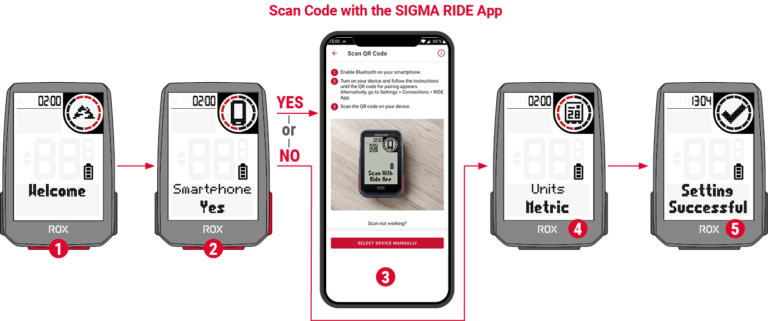
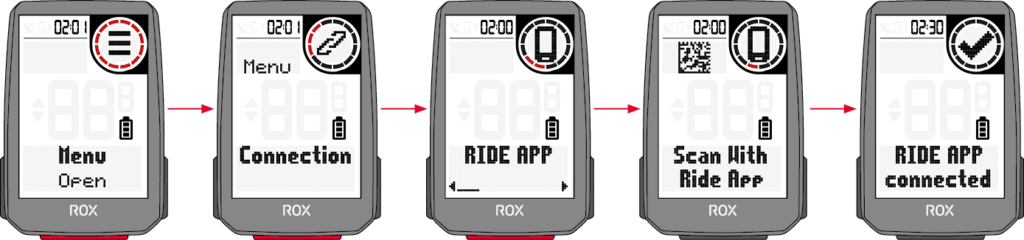
To establish the connection to the smartphone, make sure that Bluetooth is switched on on your smartphone. You have to download the SIGMA RIDE app from the respective app store (iOS or Android). If these two requirements are met, select the menu item Connections> Smartphone. The ROX 4.0 displays a QR code that can be scanned with the SIGMA RIDE app. For the rest of the process, please follow the instructions in the SIGMA RIDE app.

The SIGMA RIDE app will guide you according to various authorizations, among others. Ask for location approval. Agree to these authorization requests in order to ensure optimal functionality of the SIGMA RIDE App.
If you have successfully connected the smartphone, you can see in the menu item Smartphone which smartphone was connected to the device and cancel the pairing to the smartphone. Please note that the
ROX 4.0 can only communicate with ONE smartphone. -
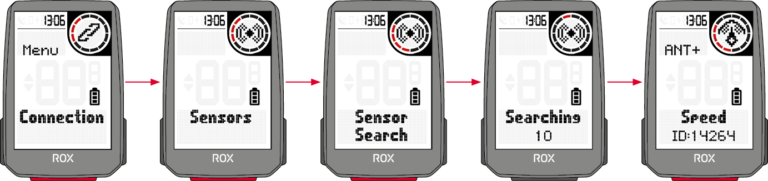
Connection to external sensors
To establish a connection with a sensor, the sensor must be within radio range (a maximum of approx. 10 m away). In addition, the sensor must be activated or switched on.
How to mount the supplied sensors (only available in the SET or as an accessory) is described in the chapter Assembly.
If you have not yet connected any sensors, select the menu item Sensors and Search for new sensors. The ROX 4.0 then searches for all available sensors. If sensors are found, a list with all newly
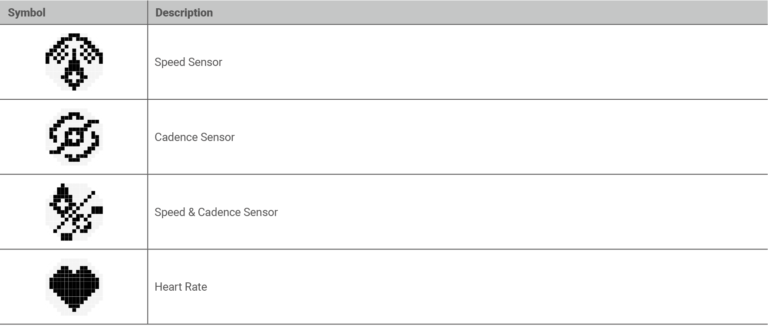
found sensors appears. Navigate through the list with +/- and select the desired sensor. For ANT + sensors you will see the sensor ID in the list, for BLE sensors the name of the sensor appears.The following symbols stand for the different sensor types:

To pair a sensor with the ROX 4.0, select the sensor in the list and press the START button. The pairing starts immediately and you will receive a message about the status of the pairing. If an error message is displayed, please check the requirements described again.

If you have already connected sensors, you can add new sensors as well as view and manage the existing sensors by selecting Connection > Sensors.
In the list of connected sensors you can also see the battery status of the sensor. If you want to disconnect the sensor, press the START button and follow the instructions on the display.
During training, you will receive a short message when a sensor has been connected or the connection to a sensor is lost. If a sensor is not found, the ”- -” symbol appears after 5 minutes instead of the value (e.g. cadence). Then please check whether the sensor is within range and switched on. If you would like to connect a sensor to the device at a later point in time, open the quick menu by pressing START for a long time (in the started training). Then select Search sensors. The ROX 4.0 then briefly disconnects all connections and reconnects the sensors.
In order to be able to view the data from the sensors during training, remember to adapt the training views accordingly.
-
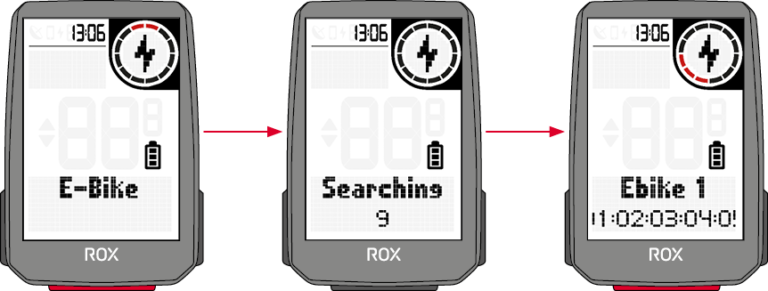
E-Bike
To connect an e-bike to the ROX 4.0, select the E-bike menu item in the connection settings. If there is currently no e-bike paired with the ROX 4.0, the ROX 4.0 immediately searches for available e-bikes.
Whether your e-bike is compatible with the ROX 4.0, please refer to the following list: Link to the compatibility listFor pairing, the e-bike must be nearby (maximum approx. 10 m away) and switched on. Please refer to the operating instructions for your e-bike to find out whether further steps are required on
the e-bike side to connect the e-bike to a display.Only ONE e-bike can be connected to the ROX 4.0 at a time.
If compatible e-bikes are found, a list of the e-bikes found is displayed after the search. Select the desired e-bike (+/- button) and start pairing with the START button.
If the pairing is successful, you will be taken to the information view of the e-bike. You can also reach this when you select the menu item with a paired e-bike
Select E-Bike in the connection settings. Here you can see various information about the e-bike and can disconnect the connection between the ROX 4.0 and the e-bike.
To do this, press the START button in the e-bike overview.
-
-
Device settings
To change the settings of your device, select the Device menu item in the settings. The settings are described in the following table:


-
Set total data
You can set your total values in the menu item Settings> Total values, if these have been deleted, for example, by resetting the device.
Select the corresponding value (distance, training time, altitude) with the +/- buttons and press the START button.Then you can set each digit individually with the +/- buttons. Confirm the setting with the START button.
-
-
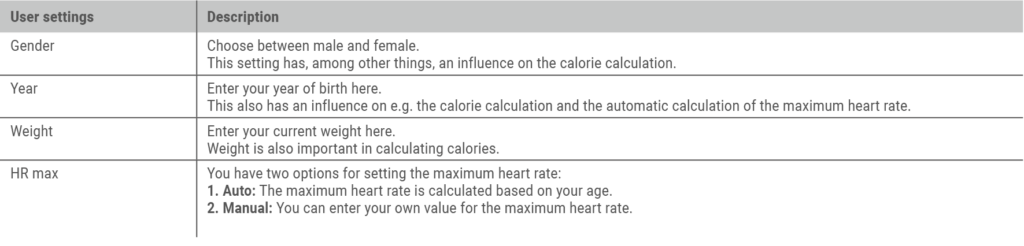
Set user data
The following table describes which user data you can set on the ROX 4.0 and what influence these settings have on the use of the device and its data. To set the user information, select Settings › User.

-
Make settings with the smartphone
You can also easily make all the settings with your smartphone and the SIGMA RIDE app. To do this, connect your smartphone to the SIGMA RIDE app. Settings cannot be made in DATA CENTER.
-
Set training views
You can set the training views for the ROX 4.0. You can also create up to 6 training pages with 4 values per page. The ROX 4.0 is delivered with standardized settings and views.
To adapt these to your needs, first connect the ROX 4.0 to the SIGMA RIDE app.Then select Set training views in the SIGMA RIDE app. You can assign a value to the field by clicking on the appropriate field assign that you would like to see in training.

-
-
Navigating with the ROX 4.0
With the ROX 4.0 you have various options for navigating. These are described below.
If there is a track on the ROX, it can be started or canceled under the “Navigation” item in the main menu, but also in the shortcut menu.
As soon as a route (Search&Go) is transferred to the ROX or a track is started, the navigation page is displayed, showing the track, the turn-by-turn instructions and the distance to the next turn.
You can also configure these fields on any other training page with the SIGMA RIDE App.-
Back to Start Navigation
With the back to start navigation you can find your way back to the starting point in almost any situation. The arrow navigation always points directly to the starting point of the training unit and shows you the direct distance to the starting point.
-
Search & Go
From firmware version 3.07 and the SIGMA RIDE app version (Android 1.3.11 & iOS 1.3.17) you now have automatic re-routing of your “Search & Go” route. This means that when you leave the route, if you have an active connection to the SIGMA RIDE app, the route to your destination is automatically re-planned and this new route is sent to the ROX.
The Search & Go function is a one-point navigation. With the help of this, you have the option of navigating to any destination quickly and easily. When the route is planned, the relevant turn-by-turn directions will be displayed on your ROX. The procedure is as follows:
- Connect SIGMA RIDE APP and ROX
- Navigation -> Search & Go
- Enter the destination or select a point on the map
- Determine route
- Routing option can be selected over die bike icon
- Start the route or save it as a track

-
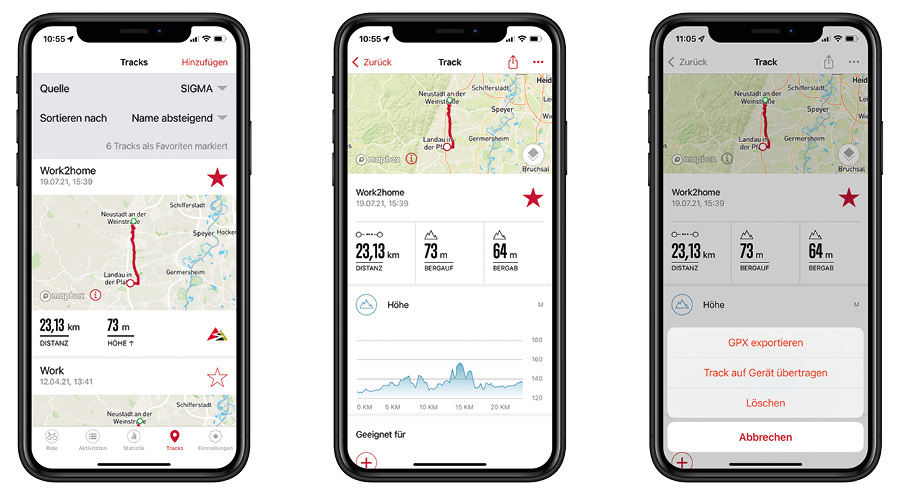
Track
With the track function you can transfer a created track to the ROX and start it. To transfer the track to the device, there are different possibilities.
Via the Navigation Icon:
- My Tracks
- Select Track
The track is now transferred to the ROX and can be ridden directly (Please note: the ROX must be switched on and connected to the SIGMA RIDE App.

Via the Track menu:
- Choose track
- „…“ Menu
- Send track to device

Now the track can be selected through the main menu or the short cut menu of the ROX.
-
Navigating with komoot
Starting with firmware version 2.06 and the SIGMA RIDE app version 1.2.21 (Android & iOS), you can download your komoot track including turn-by-turn directions directly to your ROX via the RIDE app. As a result, the komoot connect service is no longer required and is removed.
Note: Only planned komoot tours in activated regions are synchronised with the SIGMA RIDE app.
! NOTE ON EARLIER FIRMWARE VERSIONS !
For all previous firmware and app versions up to firmware version 2.06 and the SIGMA RIDE app version 1.2.21 (Android & iOS) the komoot connect service is valid:
Android
With Komoot Connect Navigation, select a planned route in the Komoot app. The turn-by-turn instructions that the Komoot app sends are displayed on the ROX 4.0.
To establish the connection between Komoot and the ROX 4.0, proceed as follows:- Download the Komoot app from the Google Play Store
- Create an account and activate the region
- Pair your smartphone with ROX 4.0 via the SIGMA RIDE app
- Open the Komoot app
- You can now connect the ROX 4.0 to the Komoot app under “Bluetooth Connect” in your profile settings
- To do this, go to ”Connections > Komoot” in the main menu of the ROX 4.0 (training not started) and start the connection from the device side ›Wait until a successful connection is displayed.
To then navigate with the app, follow these instructions:- Plan your route in the Komoot app
- Start the route
- The turn-by-turn instructions are displayed on the ROX. To do this, you must define the turn-by-turn instructions as one of the training values in the training (see Setting training views).
- If you leave the route, Komoot will recalculate it and the turn-by-turn instructions will be adapted accordingly on the ROX 4.0
ATTENTION, with Android the Ride app must be open in the background to enable a connection with Komoot.
iOSWith Komoot Connect Navigation, select a planned route in the Komoot app. The turn-by-turn instructions that the Komoot app sends are displayed on the ROX 4.0.
To establish the connection between Komoot and the ROX 4.0, proceed as follows:- Download the Komoot app from the App Store
- Create an account and activate the region
- Pair your smartphone with ROX 4.0 via the SIGMA RIDE app
- Open the Komoot app
- You can now connect the ROX 4.0 to the Komoot app under “Bluetooth Connect” in your profile settings
- The ROX 4.0 automatically connects to the Komoot app, wait until a successful connection is displayed.
To then navigate with the app, follow these instructions:- Plan your route in the Komoot app
- Start the route
- The turn-by-turn instructions are displayed on the ROX. To do this, you must define the turn-by-turn instructions as one of the training values in the training (see Setting training views).
- If you leave the route, Komoot will recalculate it and the turn-by-turn instructions will be adapted accordingly on the ROX 4.0
-
-
More training functions
-
Interrupt training
If you would like to interrupt the training for a longer period of time, e.g. for a longer lunch break, you can switch off the ROX 4.0. To do this, open the quick menu (in AutoPause or while training is in progress) and select the menu item Switch off.

To wake up the device and continue your training, switch it on as usual. You can also use the device when the Turn off training.
As long as the data is not reset by long pressing the + button, you can continue the current training.ATTENTION: If a training session is continued over several days, the date of the last day is only written at the end. Connect the ROX 4.0 in this period of time with the PC, the training session is closed.
-
-
Evaluation of the training data on the device
Select Storage > Total to see an overview of all exercise data performed on the device.
Here you can get:
› Total kilometers
› Total time
› Total vertical meters uphillYou can also set the total values again via the SIGMA RIDE app, e.g. after resetting the device firmware.

-
Evaluation of the training data using software
-
SIGMA RIDE app
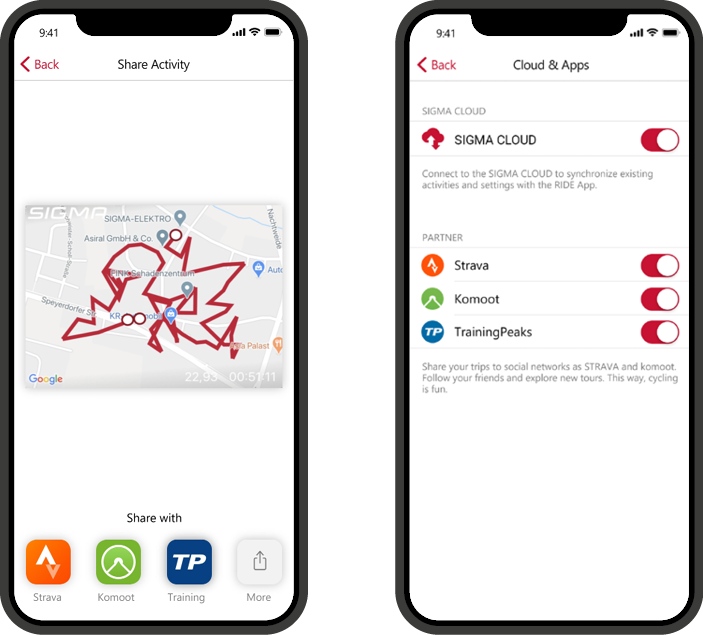
With the SIGMA RIDE app you can carry out an extensive evaluation of your training data. Different training parameters, graphics, etc. are displayed for each training unit. You can also export your training data to third-party portals directly from the SIGMA RIDE app. Please refer to the sharing menu of the app to find out which portals are available for this. To view previous training units, switch to the activity list and select the relevant unit.

-
SIGMA DATA CENTER
In the SIGMA Data Center you have even more in-depth analysis options for your training data. In addition to the functions in the SIGMA RIDE app, you can dive deeper into the data and export the data in other formats (e.g. .csv).
-
Third party providers
The training data of the ROX 4.0 is available as a .FIT file. Therefore all portals that use this standard can read the data of the ROX 4.0. You can export to relevant third-party providers using the SIGMA RIDE app. If the portal you want is not available for automatic synchronization, you also have the option of uploading the .FIT files directly to the third-party provider. To do this, you have to connect the ROX 4.0 to the PC via a USB-C cable. The training data can then be found in the Activities folder.

-
-
SIGMA Performance Index (SPI)
The SIGMA Performance Index, or SPI for short, offers you an objective assessment of your training performance. You can find this value for every training unit within the SIGMA RIDE app. The value is made up of 3 different variables:
› The meters in altitude uphill
› The total distance of the training
› The average speedIf these values increase, the SPI also increases. If you look at your SPI values over time, you can see a clear increase, stagnation or performance -recognize deterioration.
The SPI does not consider any individual data such as heart rate or performance. The value is given without a unit and can have values between 1 and 9999, with most values in the range from 1- 600.These examples will give you a feel for the SPI:
The following examples illustrate the meaning and interpretation of the SPI:
› In a cycle race, all athletes drive the same route. The one with the highest SPI wins. The altitude and distance are the same for all athletes, only the highest average speed makes the difference here.
› If you drive the same route with the same average speed but less elevation gain, the SPI will decrease because the elevation gain is taken into account in the calculation
› If two athletes drive the same distance at the same speed, they have the same SPI value, even if heart rate and performance may be different. -
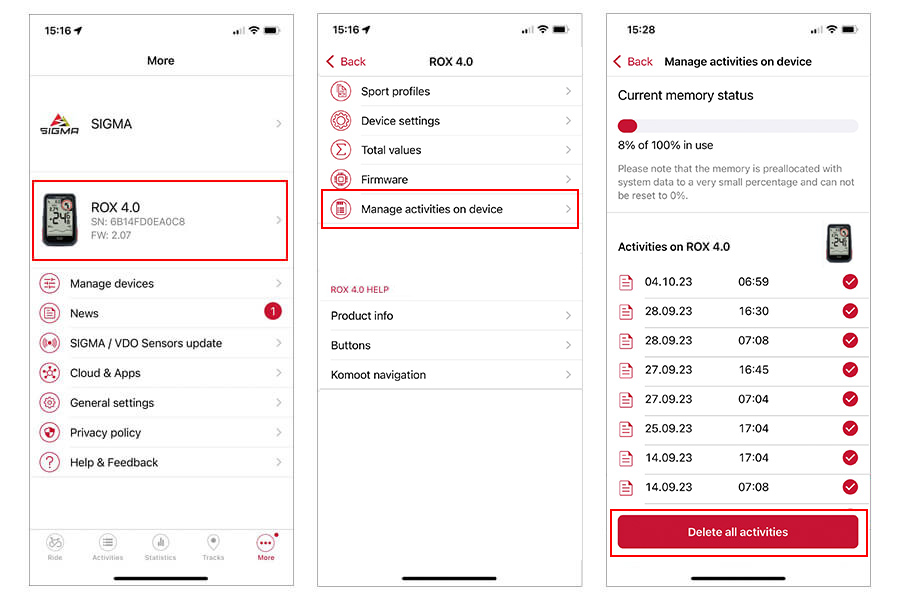
ROX 4.0 Activities Clear Memory
To reset the Activity memory of your device, please follow these steps:

Note: No personal setting will be deleted and all activities will remain in the RIDE App
-
Firmware update
You have the following options to update the firmware of the device:
› Use of the SIGMA RIDE appYou can find out whether a new update is available for your device when you connect the device to the SIGMA RIDE app. If there is new firmware, you will receive a message in
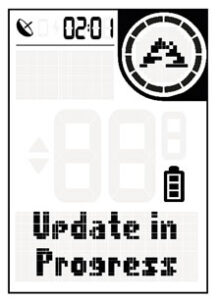
the app and can then transfer it to the ROX 4.0 accordingly.Once the update has been transferred to the ROX 4.0, you will receive a message on the ROX 4.0. Confirm this if you want to install the update now. Your settings will be retained after the installation.

-
Problems during the Update
If something went wrong with the update of your ROX 4.0 you find here useful information.
If your device is frozen during the update process and the GPS Symbol is always on, it is easy to recover your device.
For the recovery, please download the Firmware file here.
Important: For this process a PC is required.
After downloading, connect your ROX to the PC and copy the firmware file (.bin) to the ROX (on the top level, not in a subfolder). After disconnecting, the update should now continue.
If you continue to have problems with the update, please contact our customer support.
-
-
Technical information
-
Specifications

We recommend to charge the device at room temperature 23°C ± 5°C
-
Cleaning the device
We recommend cleaning the ROX 11.1 EVO at regular intervals and when it is heavily soiled. Please only use mild detergents for this. Regular cleaning of the device is necessary to ensure that the height sensor, for example, functions optimally. To clean the height sensor, soak the ROX 11.1 in clear water for a few minutes and then rinse the device again under running water. If it is very dirty, dirt can block the buttons. In this case, please follow the same instructions as for cleaning the height sensor.

-
EU declaration of conformity
We, SIGMA-ELEKTRO GmbH, Dr.-Julius-Leber-Str. 15, D-67433 Neustadt / Weinstraße declare that the ROX 11.1 EVO bike computer and the SPEED, CADENCE and R2 Duo transmitters, when used as intended, meet the basic requirements of RED Directive 2014/53 / EU and RoHS Directive 2011/65 / EU.
The CE declaration can be found at: ce.sigmasport.com/rox111evo
-
UK declaration of conformity
We, SIGMA-ELEKTRO GmbH, declare that the equipment above has been tested in our facility and found compliance with the requirement limits of applicable standards, in accordance with the Radio Equipment Regulations 2017 and the Restriction of the Use of Certain Hazardous Substances in Electrical and Electronic Equipment Regulations 2012. The test record, data evaluation and Equipment Under Test (EUT) configurations represented herein are true and accurate under the standards herein specified.
The UK declaration can be found at: ukca.sigmasport.com/rox111
-
Guarantee conditions
We are liable to our respective contractual partner for defects according to the statutory regulations. Batteries are excluded from the warranty. In the event of a warranty, please contact the dealer from whom you bought your bike computer. You can also send the bike computer with your proof of purchase and all accessories to the address below. Please ensure that there is sufficient franking.
SIGMA-ELEKTRO GmbH
Dr.-Julius-Leber-Strasse 15
67433 Neustadt / Weinstrasse
Germany
Service Tel. + 49- (0) 6321-9120-140
Email: kundenservice@sigmasport.comIf you have justified warranty claims, you will receive a replacement device. There is only an entitlement to the current model at the time. The manufacturer reserves the right to make technical changes.
-
Disposal
Batteries must not be disposed of with household waste (Battery law)!
Please bring the batteries to a designated handover point or to a retailer for disposal.
Electronic devices must not be disposed of with household waste. Please hand the device over to a designated disposal point or to a retailer.
Before disposal, all personal data must be deleted from the device.
-
-
Download manual
-


-
FAQ
-
The new navigation update at a glance

-
How can I connect to the SIGMA RIDE APP via smartphone?
Simply connect your smartphone using the QR code displayed.
If you do not receive a QR code, please press Select device manually when connecting. -
How do I delete my sports profiles?
Open the SIGMA RIDE APP and select the device you are using.
In the Sport profiles tab, you can delete the corresponding sport profile by swiping from right to left. -
How do I perform a tour data reset?
Press and hold the right button until the tour has been saved.
-
Why are values from my e-bike missing?
The ROX is merely a display device. If values are displayed incorrectly, please update your e-bike system.
-
What does the red circle on the device display mean?
The Red Circle is a graphic element that supports the training value in this circle. For example, it counts down slowly when you make a turn so that you can see when the next turn is coming up. Another example would be the compass. Here, the two red elements always point north.
-
How can I set the time zone as well as the time?
Time zones / time of day – Every time you switch on the device and acquire satellite signals or synchronise the device with your smartphone, it automatically determines the time zone and the current time.
-
Can I also use mounts from third-party suppliers?
Only use the bracket from SIGMA SPORT.
-
What does the AM pop-up settings mean?
Assist mode pop-ups are short displays of your e-bike’s assist mode when you change it.
-
ROX 4.0 - UPDATE SENSOR FIRMWARE
You have the following options to update the firmware of the sensor:
› Use of the SIGMA RIDE app
You can find out whether a new update is available for your sensor when you connect the sensor to the SIGMA RIDE app. If there is new firmware, you will receive a message in the app and can then transfer it to the sensor accordingly.
Once the update has been transferred, activate your sensor again and connect it to the app. Now you are able to check, if the upate has been sucessful.
-
ROX 4.0 - How many sensors can I connect?
You can connect up to 3 sensors to the ROX 4.0.
-
ROX 4.0 - How do I install a FW manually?
You can download the firmware file here: https://sigmasport.com/de/product/rox-4-0/?tab=service#resource-43620-change-log
After downloading, connect your ROX to the PC and copy the firmware file (.bin) to the ROX (to the top level, not to a subfolder). After disconnecting, the update should now continue.
If you continue to have problems with the update, please contact our customer support.
-
-
Change Log
-
ROX 4.0 (v1.04)
- Automatic Altitude calibration was optimized
- An error was solved resulting in an incorrect display of total values
- An error was solved resulting in an extreme increase of trip distance
- An error was solved resulting in incline not reset when speed is 0
-
ROX 4.0 (V1.12/1.13)
Bugfixes
- fixed an incorrect eBIKE range display for some ebike models
- fixed an error preventing to show the assist mode names for some eBike models
- fixed a misindication of the current charging status, when device was switched off
- fixed an issue with total data, when smartphone was connected during training
Improvements
- General UI improvements
- improved pairing process with Sigma Ride App
- added charging status (%) when device is charged in OFF status
- distance until next turn will now be shown in “m” instead of “km” for Komoot navigation (if distance is <1km)
- GPS power consumption was optimized
- a separate Navigation page will be added when Komoot navigation is active
- drastically improved sensor connection speed for ANT+ sensors, when device is switched on
-
ROX 4.0 (V1.22)
Improvements
- E-Bike assist mode pop-up was added to the device settings
- E-Bike gears can now be added as a training parameter, if a compatible E-Bike is connected
- Cadence and power can now be added as a training parameter, if a compatible E-Bike is connected
- More than one sensor type can be added
- The design of the assist mode was optimized
Bugfixes- High speeds preceding an autopause was fixed
- E-Bike data for Zehus and Fazua was fixed
- Connection via ANT+/BLE was improved
- Heart rate sensor connectivity was improved
-
ROX 4.0 (V1.27)
- Added QR-Code Pairing
- Improvement of the E-Bike connection (Zehus E-Bike Systems)
- General improvements and bug fixing
-
ROX 4.0 (V2.06)
- Added Track Navigation
- Added Search and Go
- Advanced komoot track feature
- The procedure has been simplified for all hard-working komoot users. Now you can load your komoot track, including the turn-by-turn directions, directly onto your ROX via the RIDE APP. As a result, the komoot connect service is no longer required and is therefore removed.
- You can find more information here: blog post
-
ROX 4.0 (V2.07)
- Improvement of the file management system
- General improvements and bug fixing
-
ROX 4.0 (V3.07)
- Re-Routing of a Search and Go Track
- Improvement of the Track zoom level
- Bug Fixing
-
-
Short manual
Accessories
Over Clamp Butler GPS
GPS Mount
ANT+/BLUETOOTH SMART HEARTRATE TRANSMITTER

COMFORTEX+ Elastic Strap
DUO MAGNETLESS SPEED
DUO MAGNETLESS CADENCE

USB-C Cable
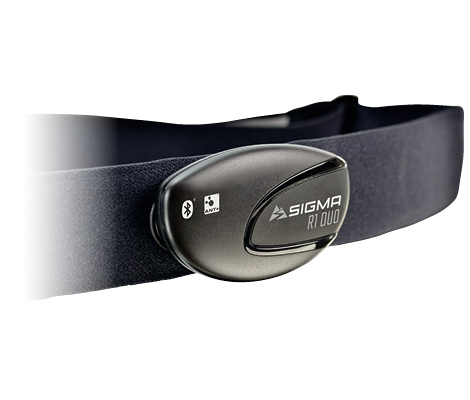
ANT+/Bluetooth SMART HEARTRATE TRANSMITTER R1
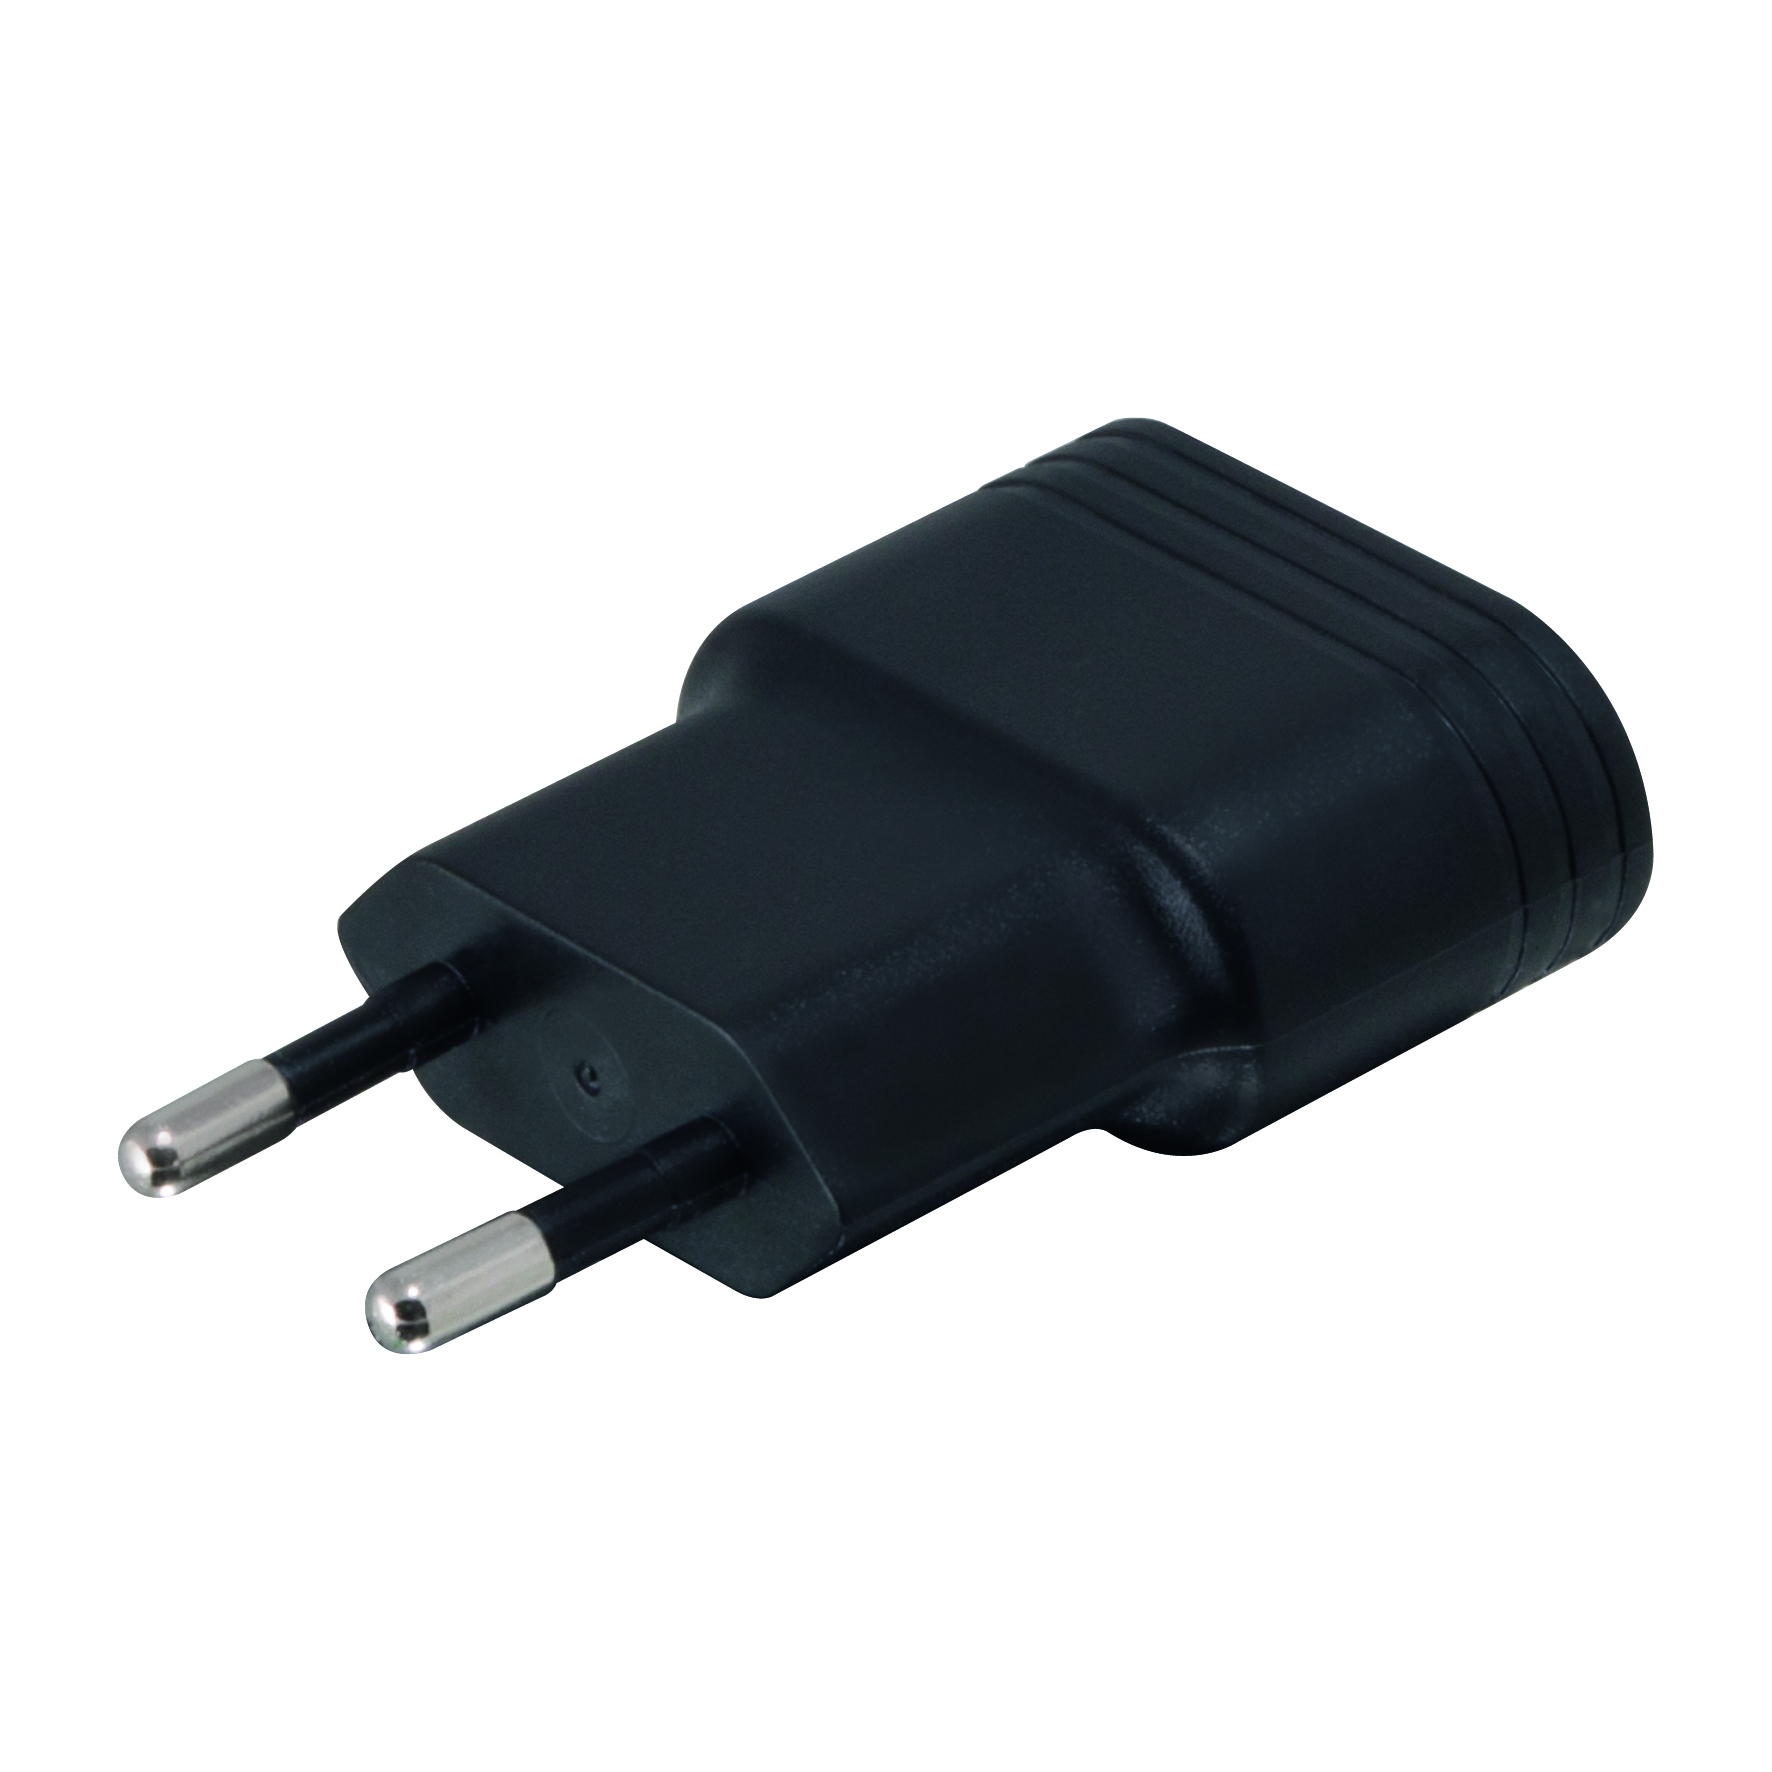
USB Charger
- 1